Haiku Sequencer Project

Introduction

As you probably already know if you've found this page, I'm working on a new BeOS- / Haiku-native MIDI sequencer (MIDI-only).

Although I'm focusing on the core sequencer engine right now, some decisions will be required regarding the GUI soon. Some of these decisions will even influence the core sequencer engine.

Updates

  • 13-Nov-2007: Reduced column width for readability. Added another suggested colour scheme (involving four colours) to the section discussing the square colours in the arrangement window.
  • 12-Nov-2007: The first release.

Mockup Screenshots

Over the last couple of years, I have given quite a bit of thought to how the GUI should behave. However, my thoughts on this matter are by no means final, and aren't even complete. Since I haven't written any GUI-related code for it at all, this is completely subject to tweaking or even redesigning -- not just by me, but by you too. Hence why this page exists.

If you're going to invest the time to read this (now rather lengthy) document, first of all, thanks! And secondly, please keep a StyledEdit window open. If you have any thoughts whatsoever regarding the features I describe, please document them, no matter how random! I think I've highlighted just about all the important questions in bold.

In many ways, this sequencer is much closer to older versions of Cakewalk (e.g., 3.0) than other mainstream sequencers (Cubase, Logic, etc.). If you haven't already used this Windows application, you might want to look for some screenshots, or even find a copy to try. Make sure you avoid all versions higher than 3.x.

Warning: The following screenshots are entirely synthetic, created using existing BeOS applications and ArtPaint. The final application will look different; these pictures describe concepts only. Special thanks to the authors of MeV, whose GUI was used as a major part of these mockups.

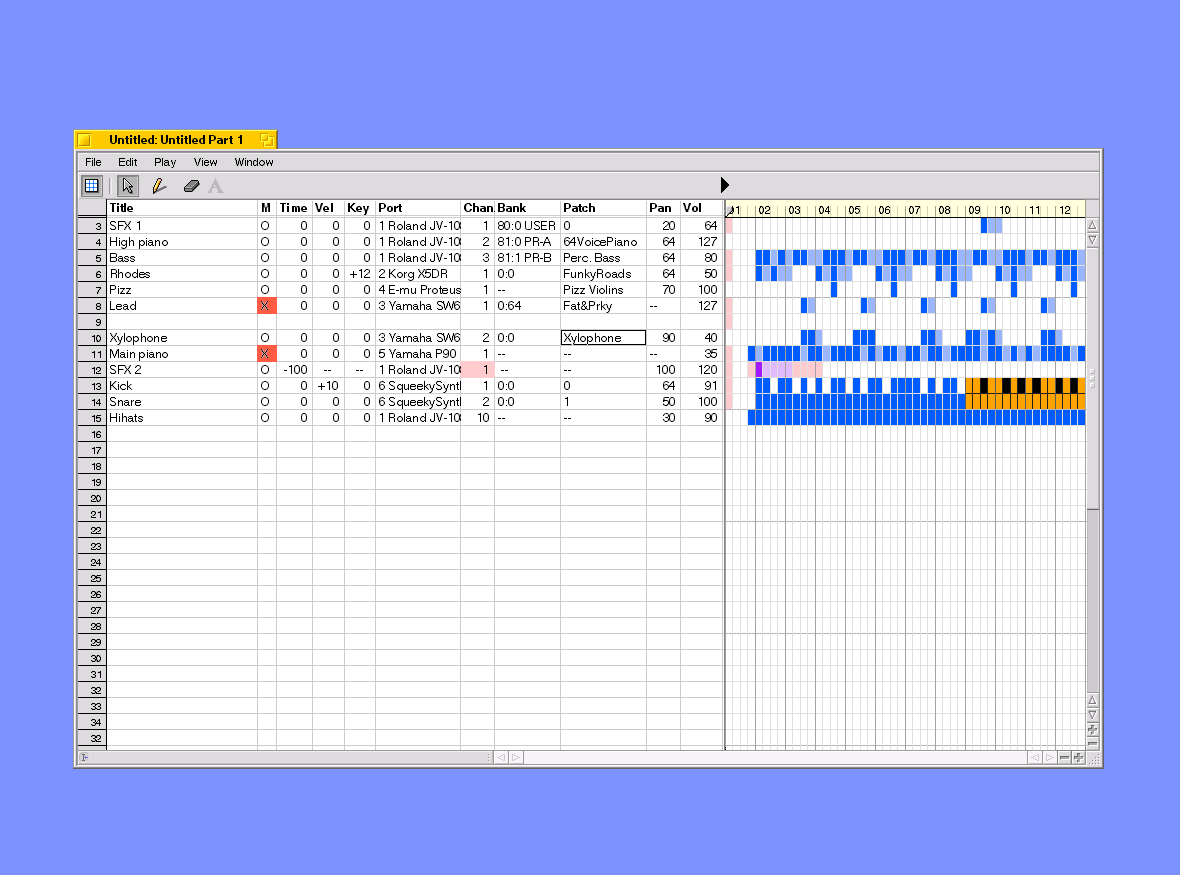
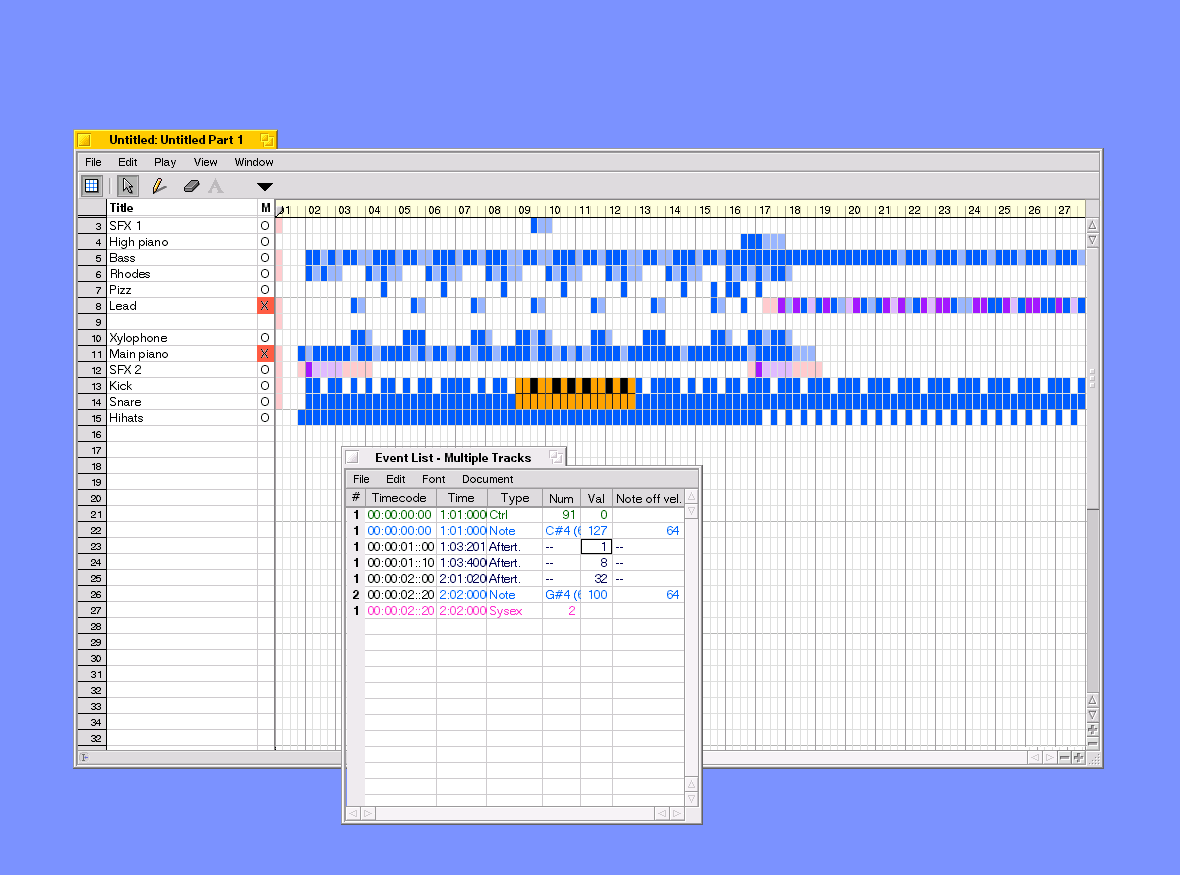
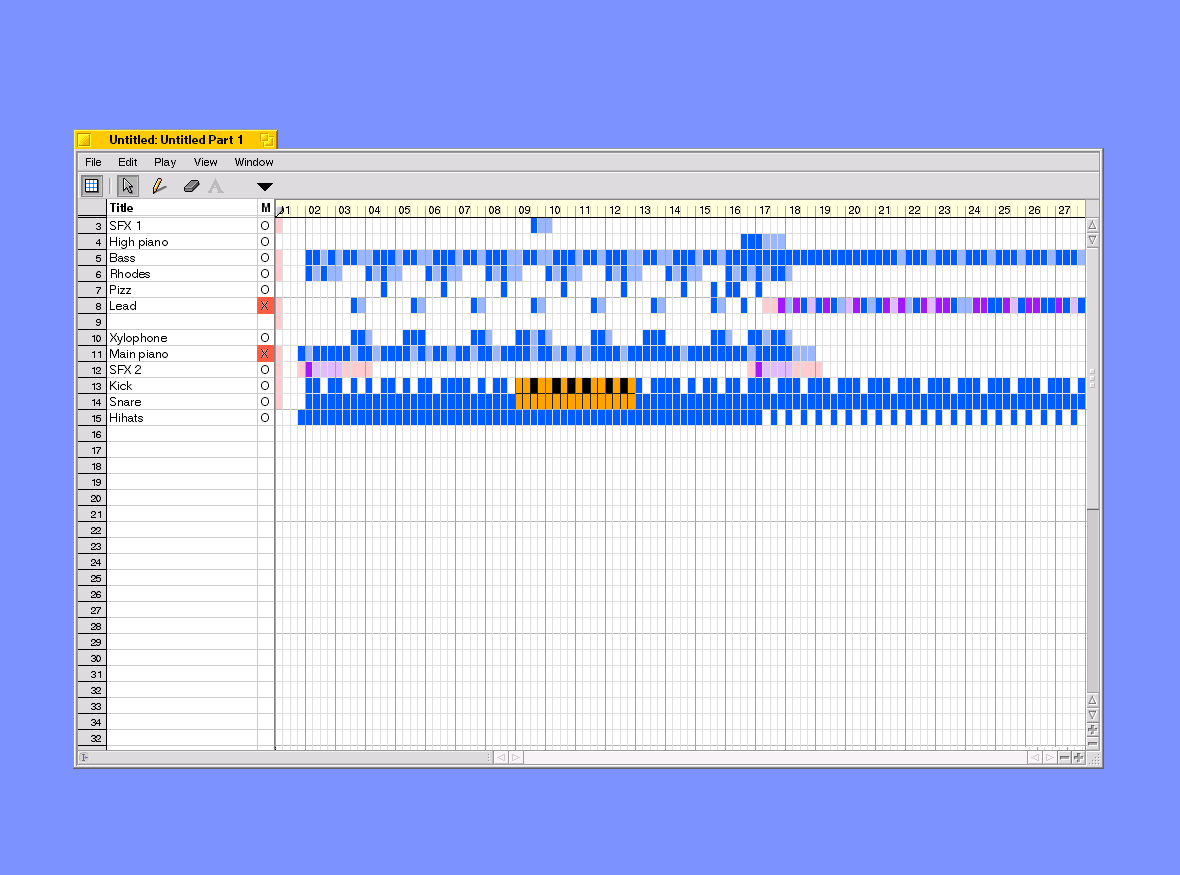
This is the main arrangement window -- the first thing you see when the application is started, and where the song's structure is built up.

Down the left, we have the track numbers, along with their user-assigned names (don't be alarmed -- the maximum track number will be something like 256, not 33 as shown here). Text fields can be edited by moving a spreadsheet-style cursor up and down with the cursor keys or mouse. Like practically all sequencers, different vertical positions will represent different tracks (I mention this because MeV deviates from the standard here).

To the right of the track names, there are the mute/solo controls. Again (like practically everything else in this application), keyboard shortcuts can be used to mute/unmute/solo a track, or you can click the mute control with the mouse. Muted tracks are shown here in red -- some kind of highly-visible indicator is probably a good idea here, especially for 'solo'ed tracks.

On the right, we have the main arrangement area. Many current sequencers use the "tape-clipping" editing approach (made popular by Cubase, especially Cubase Audio), with each phrase in its own self-contained block. This sequencer does not -- it will use the more traditional "blob-based" editing. This can save time in many situations, and encourages non-repetitive song construction.

Each square of the grid represents a 32nd note (hemisemiquaver). The size of the squares (and density of the grid) is determined by the currently-selected zoom level.

The colour of each square depends on what events are in it. The specific colour scheme is to-be-decided, and may be user-configurable. In the above example, I've used the following colours:

  • White: Empty,
  • Dark blue: Note events occur here,
  • Light blue: No events occur here, but note(s) are being sustained into this block from a previous block,
  • Pink: Controller events occur here,
  • Dark purple: Controller AND note events occur here,
  • Light purple: Controller AND sustained-notes occur here.

As you can probably see, there's rather a lot of colours. Maybe too many to be useful. I might combine some of these categories together -- perhaps three colours like this would be better (any thoughts?):

  • White: Empty,
  • Dark blue: Note events occur here (with or without controllers),
  • Light blue: Controller events AND / OR sustained notes occur here.

Or maybe this: (personally, I'm leaning towards this four-colour version)

  • White: Empty,
  • Dark blue: Note events occur here (with or without controllers),
  • Medium blue: Controller events occur here, with or without sustained notes,
  • Light blue: Sustained notes occur here, but nothing else.

Before anyone asks, the squares can't display any more information, such as which specific notes are being played, or displaying different velocities as colours, etc. Aside from making the visual clutter worse, it would consume much more memory and CPU time to draw the screen. For BeOS applications, this is punishable by death. It would also make features such as smooth scrolling (while the song plays) impossible, and could suck valuable processor time away from other applications (e.g., multitrackers).

On the other hand, user-assigned colours in certain areas (e.g., marking an important area of a track red) would be possible -- any thoughts on whether this is necessary? (I'll probably be implementing "cue markers" in any case, which can be used to mark specific moments in time with a vertical line down the arrangement window).

The current play position will be marked as a vertical line down the arrangement window, with some kind of play position "handle" in the bar display near the top, so you can grab it and move it to different locations. The transport can be controlled via toolbar buttons, keyboard shortcuts (space / enter / 0 / etc.), and MIDI messages (remote control of the transport from the master MIDI keyboard).

In the current screenshot, you can see a number of toolbar buttons. These are carried over from MeV, so won't be present in the final sequencer. However, there will almost certainly be a toolbar, just with different controls (exactly which controls is to be decided, though the transport controls will be present here).

Editing using cut+paste / drag+drop is where the differences between "blob-based" editing (this sequencer), and "tape-clipping-based" editing (e.g., Cubase) become significant.

To edit the MIDI data, a certain range is selected by clicking and dragging -- no special "selection mode" needs to be selected, because this will probably be the only mode you can use in the arrangement window. The selected area is highlighted in inverse-video (see the 4-bar-long, 2-track-tall selection on tracks 13 and 14 in the above screenshot for an example). There will be a "snap" size setting on the toolbar, allowing you to select whole bars at a time, 32nd notes, etc. There will be some way of including/excluding tracks in the selection, so you could, for example, select tracks 10 and 12, but not 11. Perhaps shift+clicking another track to include it in the selection? Thoughts?

Selection may also be possible via the keyboard, using the familiar shift+cursor key method used by text editors.

Once an area has been selected, it can be dragged to a new location. If it was dropped onto an area already containing events, the events are merged (e.g., it doesn't erase the data it collides with). In addition to dragging+dropping like this, standard cut/copy/paste menu commands can be used.

If there are notes sustaining into the selected range from earlier (e.g., a note starts on bar 17 and extends to bar 20, and a selection is made from bars 19 to 30), what happens to these notes when you perform a cut operation is to-be-decided. Some options I can think of:

  • Leave the overlapping notes untouched,
  • Cut the overlapping notes,
  • Slice the overlapping notes so that part of it remains where it was, and the "sliced" part is included in the selection,
  • Determine automatically which of the above to use, based on how far the note was overlapping (e.g., if it's the last 5% of a note, ignore the overlap, if it's 95% of a note, cut it, if it's somewhere between the two, slice it into two parts),
  • ... Or possibly let the user decide, based on a global preference setting. Any thoughts?

"Bulk processing" operations can also be performed in the arrangement window. These include things such as transpose, quantize, retrograde, etc. When these commands are selected (using a menu, or keyboard shortcuts), all the events in the selected range are processed. These commands will probably be implemented using plug-ins, so users can easily implement whatever fancy commands they want (e.g., groove quantize, vertical flip, algorithmic composition, etc.).

As per Cakewalk, all bulk-processing operations, including cut/copy, go through an "event filter". The event filter can be turned on and off somehow, perhaps via a menu option. Or perhaps it could ask you each time you perform an operation? (obviously, drag+drop operations would skip this because so common, and would annoy the user with popups).

When the event filter is turned on, every event that passes through the plug-in (or cut/copied from a track onto the clipboard) is compared against the event filter. If it matches, the operation goes ahead, otherwise the event is left untouched. The event filter can be set to include/exclude a certain note range, velocity range, controller range, event type, etc.

The presence of such an event filter makes the rest of the application quite a bit simpler to use (and write), because many fancy operations can be done easily with the event filter, without needing special options.

Back to the track list on the left, as previously mentioned, there will be a spreadsheet-style cursor, which shows the currently selected track, and allows you to edit its name.

This cursor also serves to select a track for recording -- therefore, when a track is selected with the cursor, the track number will probably be filled red, to show clearly which track is selected. The selected track is also used for "MIDI thru" purposes -- anything you play will be sent to the selected destination for that track.

Unless someone specifically requests otherwise, all recording will take place onto one track at a time -- recording to multiple tracks at the same time is not possible. I may allow each event to have its own channel number associated with it, thus allowing a track to be split into 16 different tracks (one for each channel) after recording, but this is bordering on feature creep. Is anyone remotely interested in recording more than one track at the same moment in time? (seemingly this would only be necessary if you have multiple MIDI keyboards, and wish to record several players simultaneously... seems unlikely to me...)

To keep timing as tight as possible (excellent MIDI timing is a BIG design requirement for this app), recording will NOT be done directly to the track. Instead, all recorded events are stored in a temporary area in memory, which is automatically dumped onto the selected track when you disengage record mode (or change tracks).

As a user, you probably won't notice any side-effects of this, but there are two things to bear in mind: Firstly, you won't see your playing appear on-screen "live" while record mode is running -- it'll appear as soon as you stop recording. Secondly, the record buffer is *always* recording during playback, even when you're not in record mode. This is potentially useful, because if you came up with a good idea during a "dry run" (transport in play mode, not record), you can recover it by selecting "dump record buffer" from the menu.

Something I'm not sure about yet is multiple-take recording mode. This is where you set a section to be looped, and play many takes, over and over again, each recording to its own track, so you can pick the best one later.

This should be possible to implement, although it increases complexity. I could implement a "cheap and nasty" alternative, by simply dumping the record buffer when the end of the selection is reached, automatically advancing to the next track, and looping. The downside is that there will be a pause (a beat or so) whenever it loops back to the start -- it takes a tiny fraction of a second to flush the record buffer, but possibly enough to hear. My feeling is that this might upset the "groove" enough during a looped recording session to make this feature worthless, but I'd very much like your input here! I don't use multiple-take recording very much, so I can't say how significant a problem delay-on-repeat will be. Note: This problem does NOT affect normal looped playback mode (no recording).

Another alternative way of making multiple-take recording simpler to implement is to simply overwrite the previous take each time it loops. That isn't strictly multiple-take recording though, because you have to manually stop the transport when you think you've made the best performance (as opposed to choosing between them later), or alternatively, advance to the next track yourself by pressing a key (which might cause the dreaded tiny delay mentioned earlier). However, it's so easy to implement, I'll probably do this even if nobody needs multiple-take recording at all.

As you can see, in addition to writing a sequencer, I'm also writing a feature-length novel, so I'll spare you and move onto the next screenshot now (the worst is out of the way now). =P


You might've noticed the triangle in the toolbar in the above screenshot. If you didn't, scroll back and have another look.

When this triangle is clicked, the track list expands rightwards as follows:

Note: The exact placement of the triangle, and whether it's even a triangle-type control at all, is yet to be decided. Either way, there will be some easy way of expanding/collapsing it.

As you can see, this is where the tweaking happens. Each track can have its output port selected, along with its channel, and even its bank, patch, pan, volume (and possibly other controllers, such as effect sends, etc.). You can also slide tracks in time using the "time" field (useful for echo/chorus effects), add/subtract an offset from the note velocities, and transpose the track, all in realtime.

Again, the fields are edited using a spreadsheet-style cursor (visible here on track 10 -- Xylophone). There's several ways of editing each field:

  • Typing in a number directly,
  • Pressing + or - to increment/decrement the value,
  • Clicking and dragging the mouse -- in some cases, this may pop up some kind of slider (see Soundplay's volume control for an example), or it may just change the number as the mouse is dragged (thoughts?),
  • Pressing enter or double-clicking the field (this one is described in more detail below).

For the strictly-numeric fields (volume, pan, time+/-, etc.), or plain text fields (track name), double-clicking or pressing enter won't do anything particularly special (perhaps just putting the field into edit mode, allowing you to type a number).

However, for the patch and bank fields, this will take you to the patch selection dialogue.

The patch selection dialogue is a huge area of uncertainty at the moment -- a lot more planning is required here. It will definitely allow you to pick a patch by name (using a user-editable file listing the patch names and their numbers). It may also allow you to pick a patch by category (e.g., pianos, synths, etc.).

The patch selection dialogue may even include some kind of synthesizer editor. I was considering including a synthesizer editor plug-in API anyway, but originally I was going to keep these almost completely separate -- the only reason to integrate the two was so that the edits are automatically saved along with the song, and the editor data is automatically uploaded when you load the song.

However, I may consider integrating the synthesizer editor further, so that instead of a generic patch selection dialogue, whenever you press enter, you get the synthesizer editor window for that particular MIDI part. If there is no synthesizer editor installed for that particular synthesizer, then it falls back to a generic patch selector.

The synthesizer editor could even be integrated even further, presenting its adjustable attributes (e.g., filter resonance, envelope release time, etc.) as track columns, along with "volume", "pan", etc.

However, the more complex things get, the harder it becomes to write, and the more potential there is for major design problems to appear. I can also smell a hint of feature-creep here. Therefore, if you've got any thoughts whatsoever regarding this, please let me know!

As you can see, the track columns take up quite a lot of space. Therefore, you'll be able to shrink/expand them by dragging on their divider lines, just like the column headers in Tracker. There may be a menu option to turn certain columns on and off, but this isn't decided yet -- again, feedback would be useful.

Other than the newly-exposed controls, things work exactly the same in "expanded" mode compared to "collapsed" mode, so I'll move onto the next screenshot now. (See? Getting shorter already =P)


The piano roll, or "grid editor". No, there's no score editor in version 1.0. Maybe one day.

As you can see, there's a heavy emphasis on single-window operation here. Drowning in windows can be a major problem with sequencing.

Switching into piano roll view will be made as simple and efficient as possible. Maybe as simple as secondary-clicking the arrangement page at the appropriate location, and likewise to switch back to the arrangement page? A keyboard shortcut will be available too (a recurring theme, you'll note).

The currently-displayed track (which also becomes the currently-SELECTED track, for record / MIDI-thru purposes) is highlighted in red. Perhaps it should also be highlighted like this on the arrangement page.

You'll also note the tabs at the top. Perhaps these should always be visible, even when only one page is open? It may be possible to open several tracks in piano rolls, and switch between them using the tab bar.

As for the piano roll itself, this is where all the editing happens. Even the controller data must be edited in the piano roll, using the area at the bottom (here it's editing pitch bend), which can also be used to edit note velocities. There will be a relatively quick way of switching it between different common controllers.

As with most sequencers, notes can be selected with a standard "rubber band" rectangle, and be moved/resized/deleted together. The shift+click technique may also be used to select specific notes.

Whether or not selecting notes has any deeper meaning, I'm not sure. On one hand, the note selection system could be restricted purely to modifying notes in the piano roll with the mouse, as described above.

On the other hand, it could be set up so that whenever you run a plug-in of some kind (e.g., transpose), it applies only to the currently-selected notes (rather than all events in the selected range). If so, this behaviour should probably be limited to when the plugin is invoked from piano roll mode, to avoid any unexpected surprises in arrangement mode.

Another thought -- most sequencers have two separate selection mechanisms like this -- selecting (highlighting) individual notes in the piano roll, and selecting an entire "range" in the arrangement window. Does this need to be the case? Perhaps the "range" could serve the same purpose, except having a both a vertical and horizontal component. E.g., the range might represent C#4 to F#6 on track 6, bars 44-50.

The downside with that kind of selection method is that you won't be able to select notes one-by-one using the shift+click technique, so I'm not convinced. Feedback, anyone?


Similar to MeV, one feature I'd like to implement is the notion of multiple "strips" in the piano roll view.

One use for this is to have several different controller views stacked vertically below the notes, rather than just one. Whether this is important, I'm not sure -- one at a time is usually enough (providing it remembers its previous settings for that track, etc.).

However, one very useful feature for vertical stacking, which I often try to do in multi-window sequencers (with limited success), is to view the note data from several different tracks at the same time, time-aligned:

Here, tracks 6 and 8 are highlighted, for simultaneous display in the piano roll. Note how track 6 is highlighted more strongly than track 8 -- this is because it's the currently SELECTED track (for recording / midi thru). Exact visual appearance is definitely subject to change.

I'm not 100% sure how additional tracks will be selected yet, but I'm thinking along the lines of shift+clicking a track on the left (just clicking it would normally just switch the whole piano roll to that track).

In any case, as you can see, both tracks are visible, one above the other. This is a very important feature for editing multi-part harmony.


Sometimes drowning in windows can be fun. To this end, I'd like to implement "tear-out" tabs:

By grabbing a tab and dragging it well-outside of the main window, it becomes its own stand-alone window. I'm not sure how difficult this will be to implement yet, but if it's not too hard I'll try to include it. While single-window operation is generally superior to many windows, sometimes separate windows have their uses. For instance, when you need to see two separate parts of the same track (separated by a long distance) at the same time.

Care must be taken here to make sure it doesn't clash with the track selection / MIDI through system. Presumably once the window is torn out, it becomes completely independent and unrelated to the track selection system?


Of course, there will also be an event editor. This will probably be a stand-alone window, because its shape doesn't really lend itself to integration into the main window.

The event editor may be able to display multiple tracks at the same time, by highlighting multiple tracks. If so, each event will have its track number listed on the far left, as depicted here.

However, that may be feature creep and might lead to unnecessary trouble with the design. Any thoughts?

Here you can also see system exclusive (SysEx) mentioned for the first time. This is a bit of a can of worms, which I'd very much value your input on!

I'll start by describing how Cakewalk handles SysEx:

Cakewalk cannot record SysEx live. Instead, SysEx messages must be placed into "SysEx banks" (up to 128 or 256, I forget which). Then, during playback, a SysEx event is triggered by inserting a "SysEx event" in the track. This simply references a particular bank number, and fires that SysEx message off.

SysEx banks can also be set to "auto" mode, so they automatically send when the song is loaded. Each bank has its own destination port setting.

For entering SysEx data, a simple text field is provided for manually entering SysEx strings. Alternatively, a SysEx file can be loaded from disk into a bank, or it can be received from a synthesizer (by pressing the "Receive" button, performing a bulk dump, and then pressing "Finished").

Some people complain about this approach, wishing they could just record SysEx data directly to tracks, like any other events. Other people don't mind it at all, and even find the additional organization that SysEx banks provide beneficial.

So, I'm not really sure which approach to use. This is something I need your thoughts on again, because it sounds like I'm not the only one who's going to be using this thing. =P

Technically, recording SysEx data directly to a track is harder to achieve. Also, as soon as SysEx events are recorded directly to tracks, they become normal events, and therefore go into the (multi-stage) undo buffer. This can become quite a serious memory-hog, given the size of some SysEx messages. SysEx banks can be made exempt from undo, but events cannot.


Other features I haven't mentioned (or made mock-up screenshots for) include:

  • "Comments" window -- simple text editor window invoked via a menu option, saved along with the song,
  • Tempo editor -- similar to a controller editor in the piano roll (it's global rather than per-track -- should it be in a separate window because of this, or integrated into the piano roll in the normal manner, but just changing the global data? Or integrated into the arrangement window?),
  • Time signature insertion/removal -- time signatures will be signified by a vertical line down the arrangement window whenever it changes. Presumably there'll be a menu option to change the time signature at the current bar. The highest denominator allowed is 32. I'd also like to implement support for compound time signatures (e.g., 3-3-3-2/8) providing it doesn't clutter the GUI,
  • MIDI setup window -- this will let you set options such as MIDI thru enable, and also assign port numbers (as they appear in the track column list) to MIDI destinations. It may even be possible to send a single port number to multiple MIDI destinations, for layering. The reason for using port numbers in this way, rather than selecting MIDI devices directly in the track window is two-fold: 1) When using the app from the keyboard, it's far easier to type numbers to select a port, than it is to type /dev/midi/blah/... and 2) MIDI device names are often "unfriendly", and change whenever you change your hardware. By indirecting it via port numbers, the song data can be insulated from such changes,
  • Probably other little features here and there which I've documented in various clippings around the place (actually probably in /boot/home/Desktop/Stuff from Desktop/Stuff/Desktop Clutter/Old/stuff/asdasd/Clippings/ or one of the many similar locations -- yes, they really exist). I'll update this document as and when I come across them.

A further thought: I wonder if the arrangement window itself could be just another "strip", in the same way that the piano roll and controller editors are strips? Something tells me this could be a major problem though, because the track selection system would then no longer work correctly -- the track columns would have to be part of the arrangement strip, and then could no longer control the piano roll. What about if each track could be expanded/collapsed with some kind of triangle control in the arrangement view, to expose/hide the piano roll for that track, and do away with the concept of two separate pages? That seems to be mostly free of the track selection issues, but that too has a problem: if you want to view track 1 and track 64 in the piano roll, then it's not going to fit on the screen because of all the "arrangement-style" views (squares) for the 62 tracks in-between the two. Maybe the method I described above, flipping between two separate pages really is the best compromise after all?

Anyway, if you've got this far (as opposed to scrolling down to the bottom, lazy bugger =P), I must thank you! As you're no doubt aware, detailing the design of such an application isn't easy, and produces a great deal of rambling.

Hopefully you also noticed the large number of "ifs" and "maybe"s in the design document -- I even went to the trouble of highlighting some of them in bold, to hammer home the point. =P

Many of those "ifs" are going to become a problem soon, once I reach a stage with the core engine where things start depending on it. I'm still trying to resolve some of the questions, but some don't really have clear-cut answers, and even after two years I haven't come up with any.

So yes, feedback is extremely welcome at this stage. It's a common misconception that the ability to code is important when helping with a software project. Given that the time spent coding represents something like 1 - 10% of time spent on a software project, that doesn't really hold true. Most of the effort is spent designing (feature set, user interface, code design), and debugging.

Thanks again for reading!

- Cyan

Back to the main MIDI page